Tokenization Overview
Understand the end-to-end tokenization flow from browser authorization session to web component rendering, one-time token usage, and reusable token storage.
Introduction to Tokenization
To improve the developer experience and further reduce implementation complexity, Jupico offers a Web Component for credit card tokenization.
This approach encapsulates all tokenization logic inside a reusable, framework-agnostic components. Instead of manually configuring form fields and validation logic, merchants now simply embed a JavaScript bundle via a <script> tag and use a single HTML tag to handle the entire flow securely.
Concepts and Flow
The tokenization flow has two sides: your backend creates the session, and your browser renders the component. Sensitive payment data is collected through Jupico-controlled tokenization logic, not through your backend.
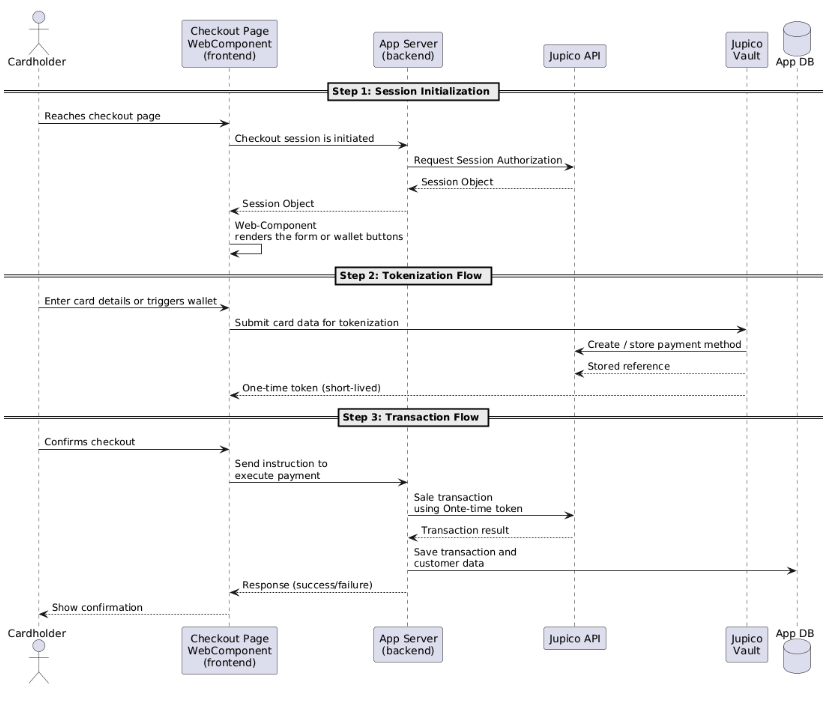
1. Authorization Session Initialization
Before rendering the Web Component, the merchant backend must call Jupico's authorization session endpoint. This is a server-to-server B2B call that authenticates the merchant and provides a session object containing all the metadata and configuration needed by the component.
Server side request example
curl --location 'https://sandbox-platform.jupico.com/v1/sessions/browser/authorize' \ --header 'Content-Type: application/json' \ --header 'Authorization: Basic YmFja29mZmljZTpkZW1vMjAxOQ==' \ --data '{ "subMerchantId": "jpt-fs-demo-acc1-m1", "tokenization": { "enabled": true }, "bankAccountTokenization": { "enabled": true }, "applePay": { "enabled": true, "amount": 23, "description": "test applePay" }, "googlePay": { "enabled": true, "amount": 23, "description": "test applePay" } }'
Best practice
Best practiceCreate a single authorization session by calling the authorize endpoint once, before rendering the payment page.
This call returns one session object containing the full payment configuration (amount, merchant, enabled payment methods).
The same session object must be passed to every Web Component you intend to initialize on that page (card form, Apple Pay, Google Pay, etc.).
Do not create separate sessions per component or on every page refresh, unless the payment context (amount, merchant, or configuration) changes.
For more details, refer to the API Reference – POST /v1/sessions/browser/authorize.
2. Render Web Component in payment page
Once the session is established, the web component is rendered on the client side. The cardholder enters their information, which is securely transmitted to Jupico’s vault. The component then returns a oneTimeToken.
- Add Jupico's JavaScript Library
- Include the Web Component
- Trigger Tokenization
- Handle Success & Error Callbacks
3. Capture payment method information
The cardholder proceeds to enter the payment method information (credit card, bank account or simple triggers a wallet such as Apple Pay or Google Pay). Jupico's tokenization mechanism executes in the background to convert this sensitive information into temporary aliases while staying fully PCI Compliance.
4. Send One-Time Token to app server to execute payment
The oneTimeToken is a short-lived token intended for immediate use in a sale or authorization request. The Application server pass its paymentToken property directly to Jupico’s transaction API
5. Your App server execute payments
/sale – use when you want to capture funds immediately: Credit Card Sale (/v1/sale)
/authorization – use when you want to place a hold first: Credit Card Authorization (/v1/authorization)
/Subscription – after you’ve performed a sale and obtained a reusable Jupico token, you can attach it to a plan: Create Subscription (/v1/subscriptions).
6. Your App server obtains the permanent token
If its desired and with previous cardholder consent the permanent token can now be stored in your system for future usage.
Token Types
Jupico supports two types of tokens for handling payment methods securely: the one-time token (OTT) and the permanent token (Jupico token). Each one is designed for a specific stage of the payment lifecycle.
One-Time Token (OTT)
The oneTimeToken is generated by the Web Component after the cardholder enters their payment details. It represents a temporary alias of the payment method.
Characteristics:
- Short-lived and single-use
- Intended for immediate transaction execution
- Not reusable or storable
The OTT is returned by the component and must be sent to your backend to execute a payment request.
Usage example
"paymentToken": {
  "data": "<insert-ott-token>"
}
This format is used when performing a /sale or /authorization request immediately after tokenization.
Permanent Token (Jupico Token)
The permanent token is a reusable representation of the payment method.
It can be obtained in two ways:
- As part of the response of a successful transaction (e.g.
/saleor/authorization) - By converting a one-time token using a
convertToPermanentrequest (with prior cardholder consent)
Characteristics:
- Long-lived and reusable
- Can be securely stored by the merchant
- Enables recurring payments and future transactions
Usage example
"paymentToken": {
  "type": "creditcard",
  "token": {
    "provider": "jupico",
    "token": "5dd19881-b437-42b0-9c9b-7773ebb598eb"
  }
}
This format must be used when executing transactions with a previously stored payment method.
Summary
- The one-time token is generated by the Web Component and is intended for immediate use in a single transaction.
- The permanent token is obtained after a transaction or conversion and can be reused for subsequent payments.