

What tokenization does
When a customer enters payment information through a Jupico web component, Jupico receives the sensitive data and returns a tokenized representation. Your platform uses the token, never the raw details. Tokens support the following use cases:- Immediate card sales
- Authorizations and later captures
- ACH/eCheck payments
- Saved payment methods
- Subscriptions
- Installments
- Wallet payments (when configured in the session)
Tokenization options
All components are initialized from a browser authorization session that your backend creates.
Token types
Basic flow
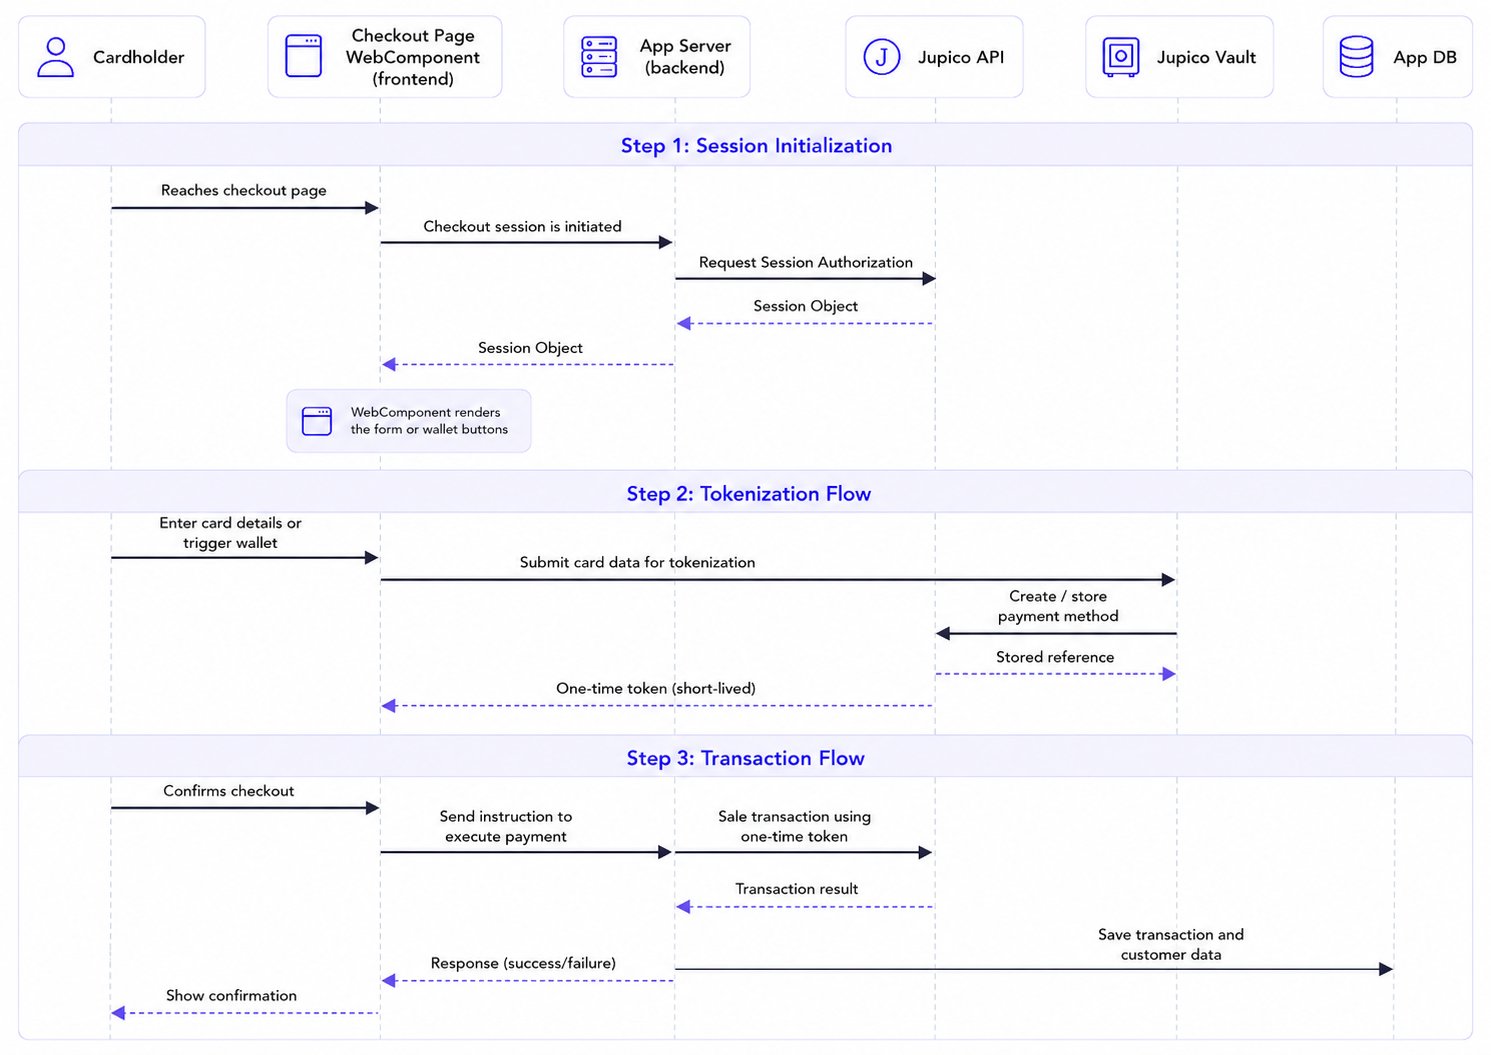
1
Backend creates a browser authorization session
Your server makes a server-to-server call to
POST /v1/sessions/browser/authorize with your API credentials. The request identifies the subMerchantId and declares which payment methods (tokenization, bankAccountTokenization, applePay, googlePay) are enabled for this page — including amount and description for wallet payments.Jupico returns a session object containing the merchant identity, enabled payment methods, and all configuration the web components need. Create one session per payment page and reuse it across every component you render.2
Frontend renders the web component
Your frontend receives the session object from your backend and passes it into one or more Jupico web components —
<tokenization-form> for cards, <echeck-form> for bank accounts, <apple-pay-jupico>, or <google-pay-jupico>. The components read the session to determine which methods to show and how they behave.3
Customer enters payment details
The customer enters their card number, bank account details, or taps a wallet button. Sensitive data is captured inside the Jupico component and sent directly to Jupico’s vault over TLS — it never touches your servers, which keeps you out of PCI scope for cardholder data.
4
Jupico returns a one-time token
Jupico vaults the payment method and returns a one-time token (OTT) to the component’s success callback on your frontend. The OTT is a short-lived, single-use alias of the payment method. It cannot be reused, stored for later, or shared across sessions.
5
Frontend sends the one-time token to your backend
Your frontend forwards the OTT to your application server through your own API. Do not attempt to charge from the browser — the OTT must be used in a server-to-server call authenticated with your Jupico API credentials.
6
Backend executes the transaction with the one-time token
Your server calls the appropriate Jupico endpoint using the OTT as the
paymentToken.data value:POST /v1/transactions/creditcard/sale— capture funds immediately.POST /v1/transactions/creditcard/authorization— place a hold to capture later.POST /v1/transactions/echeck/sale— debit a bank account.POST /v1/subscriptions— enroll the customer in a recurring plan.
7
Backend receives the permanent token in the response
When the transaction succeeds, Jupico’s response includes a permanent (reusable) token representing the same payment method. This happens automatically — you do not need to make a separate conversion call. The permanent token lives on Jupico’s side and is what you use for every future charge against that card or bank account.Storing the permanent token requires explicit customer consent to save the payment method for future use. If the customer has not consented, discard the token and let the OTT expire on its own.
8
Store the permanent token and reuse it for future transactions
Save the permanent token against the customer record in your database, along with any display metadata Jupico returns (card brand, last four, expiration month/year). For every future charge, pass the permanent token in the
paymentToken object of your sale, authorization, subscription, or installment request — no new web component render is required.Apply strict access controls: permanent tokens should only be reachable from your backend services and only used to charge the customer who originally authorized them.Authorization session initialization
Before rendering any web component, your backend must call Jupico’s authorization session endpoint. This is a server-to-server call that authenticates your platform and returns asession object containing all the configuration the components need.
The session object tells each component which merchant is processing, which payment methods are enabled, and what amounts or descriptions to display.
Create one authorization session per payment page and pass the same session object to every web component you render on that page — card form, bank account form, Apple Pay, and Google Pay. Do not create separate sessions per component or on every page refresh unless the payment context (amount, merchant, or configuration) changes.
One-time token
The one-time token (OTT) is generated by the web component after the customer enters their payment details. It is a temporary alias of the payment method intended for immediate use. Characteristics:- Short-lived and single-use
- Intended for immediate transaction execution
- Not reusable or storable
paymentToken in your sale or authorization request:
Permanent token
The permanent token is a reusable representation of the payment method. It is returned in the response of any successful transaction that used a one-time token (for example,/sale, /authorization, or the initial /subscriptions execution). No separate conversion call is required — running a transaction with the OTT automatically produces a permanent token you can store.
Characteristics:
- Long-lived and reusable
- Can be securely stored by your platform once the customer has consented
- Enables recurring payments, saved payment methods, and future one-click checkouts
To learn how to embed and configure each web component on your payment page, see Web Components.